
I noticed that cousin A, sometimes referred to as the oldest '87's middle sister, registered for a bunch of cake stands for her bridal shower.
Would she mind terribly if I made her some homemade ones instead?
Remembering my post about "How to Make a Homemade Cake Stand," cousin A immediately said, "Yes!"
The younger '88's sister, who's getting married next year, overheard and requested homemade cake stands as her bridal shower gift as well.
Lil' sis, after seeing the results of this round of crafting, requested some too. Just because.
I decided I would make a few normal cake stands and attempt a tiered cupcake stand.
Now, of course, you can easily stack two plates on top of each other, but it's also a matter of finding the right plates and the right candlestick to make the perfect cake stand and cupcake stand. Cousin A's wedding colors are purple and black. Do you know how ugly most black plates are? Or plates with black designs? So I asked her if she wanted floral plates or plain glass. She wanted simple. And since she registered for just glass plate stands, I figured that was the way to go.
The plates were a combo of what I already had on hand from previous trips to the thrift store and one that I acquired literally the day before her bridal shower. It took a bit of diligence, and a bit of stockpiling, but the results were worth it.
How to Make a Homemade Tiered Cupcake Stand
Adapted from my "How to Make a Homemade Cake Stand."
You'll need:
Candlesticks and/or heavy glasses or goblets
Plates
Epoxy, industrial-strength adhesive
Books, cans, or anything heavy to weigh the plate down
Ruler or measuring tape
Epoxy is an industrial-strength adhesive that can be found at most hardware or craft stores. I bought mine at Jo-Ann for about $4. Make sure it's the invisible, transparent kind.
A measuring tape will help you make sure the plate is centered on the stand.
And you'll need heavy stuff to weigh it down.
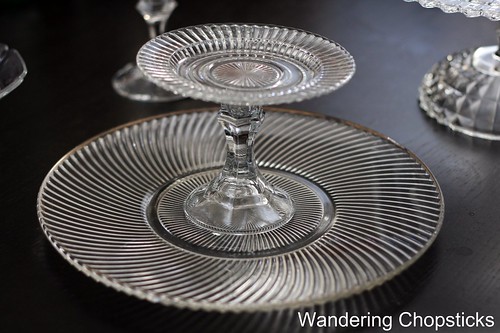
Figure out which combo of plates and candlesticks you think go well together.
Apply the adhesive to the bottom of the candlestick and put it on the plate. The glue won't stick right away, so you have time to measure the distance between the candlestick and the plate to make sure it's centered. Epoxy can be toxic, so make sure you're in a well-ventilated area and that you're not gluing a surface that will touch food.
Then add Epoxy to the top of the candlestick.

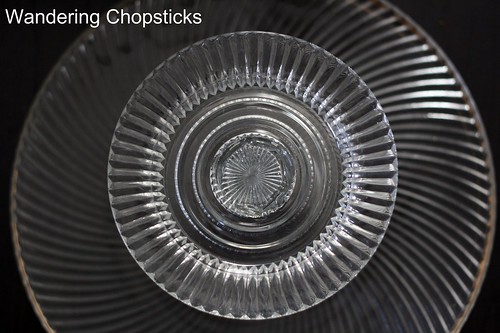
Then carefully add the top plate over the candlestick. Look on top and make sure it's directly centered. Wipe off any extraneous Epoxy with a toothpick.
Then weigh down with books or similarly heavy objects.
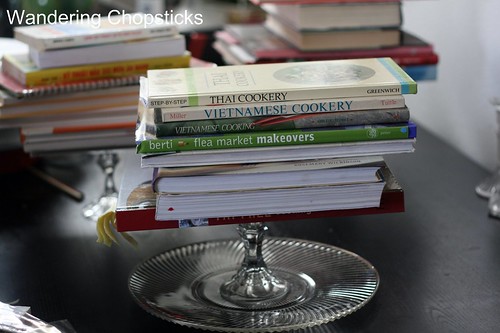
Leave overnight to make sure the glue sets.
And you get this.
If you're not stuck on just glass, you can experiment with other plates for something like this.

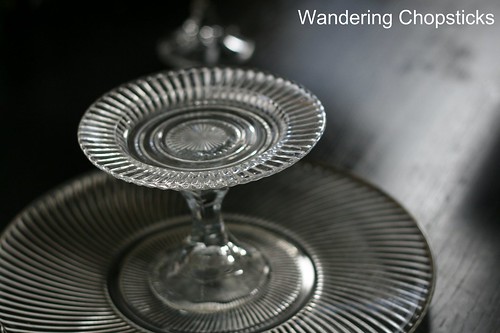
Altogether, I made cousin A the tiered cupcake stand, a large cake stand, and a medium cake stand.
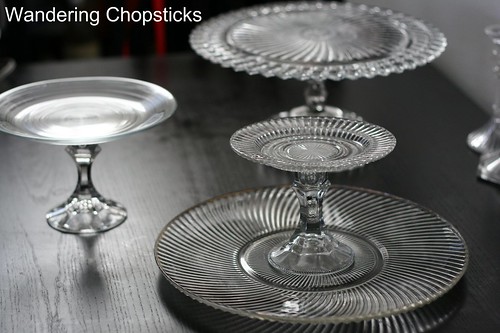
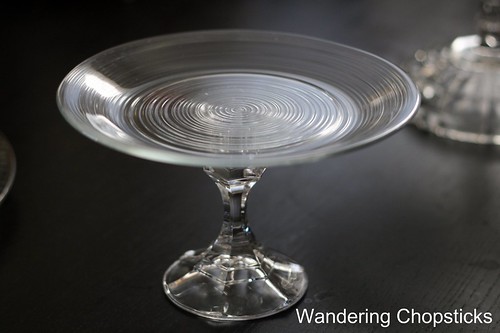
The medium cake stand was as simple as I could think of in case she didn't like anything too fussy.
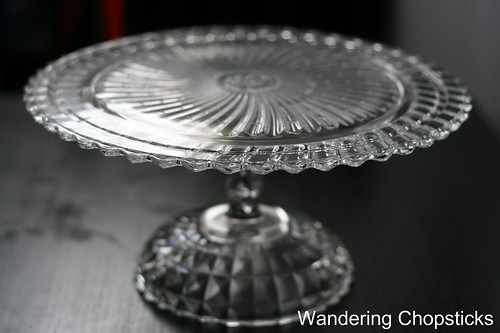
The large cake stand you've seen before from my previous post. Shhh! I hadn't actually glued it together when I blogged it. No storage in my kitchen you see. Then decided that that combo worked best and that I would gift it to my cousin. This was lil' sis's favorite and she wants one just like it. As if it's that easy to find a similar plate and goblet!
The medium cake stand perfectly sits on top of the large cake stand so in effect, it doubles as a tiered cupcake stand as well. See how clever I am? ;)
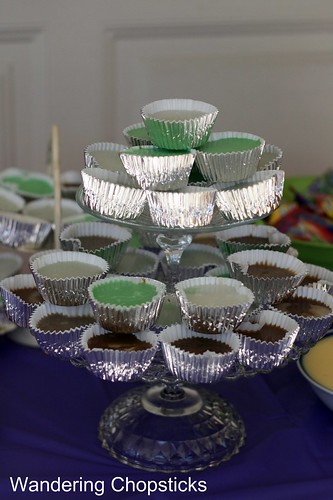
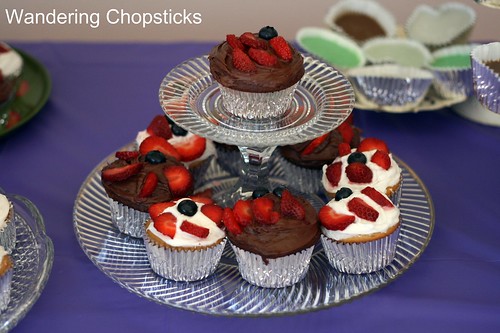
Here it is in action at cousin A's bridal shower, holding Vietnamese jellies.
And the tiered cupcake stand as well.
Easy! The hardest part is finding the right plates and candlesticks. All three were made for less than $10. Shhh! Don't tell my cousin that.
Other homemade cake and cupcake stands:
How to Make a Homemade Cake Stand
How to Make a Homemade 3-Tier Cupcake Stand
If you'd like to purchase these handcrafted tiered cupcake stands, check out my Wandering Chopsticks Etsy Shop.
*****
1 year ago today, longan blossoms and fruit.
2 years ago today, homemade Thai Red Curry Paste.
3 years ago today, Southern Indian vegetarian, Indian Chinese cuisine, and unlimited dosas at Woodlands Indian Cuisine - Artesia (Little India).
So clever! I love it. Thanks for sharing!
ReplyDeleteI'm doing homemade gifts this year, and now you've given me another idea. I think I'm going to find some plates and do some kind of 50's modern or Marmeko-style stands. Too cute!
ReplyDeletehi wc - i remember your previous post and i went nuts thrift store shopping several months ago. now i've stockpiled a bunch of plates and candlestick holders. i plan to make cupcake stands and a few tiered ones (i got lucky and got a matching large plate with smaller plate) for my friends. i like the idea of using these not just for dessert display but to put my jewelry (with a smaller plate of course)or other little things to get them off the counter.
ReplyDeletenow how do you wrap these things? :)
Jenn,
ReplyDeleteI think that's the third time I've heard clever used in regards to this. :)
DP,
I have a variety of plates I would use for someone with more adventurous tastes too. Floral, Asian, solid colors. Possibilities are endless.
CC,
I saw! Can't wait to see your final results. I just bought a few more plates to make lil' sis's tiered cupcake and cake stands. I like the idea of using them as jewelery holders as well. I use a pretty individual-sized trifle bowl in my bathroom to hold rubber bands and hair clips.
Well, I didn't wrap these gifts. ;) Just gave them to my cousin in advance so she could use them to display desserts at her bridal shower.
Wonderful idea, and doesn't cost an arm and a leg! You are so amazing, WC
ReplyDeleteCo Toan,
ReplyDeleteWhy thank you! :)
Awesome, I love this idea! You are inspiring me to go find some great thrift store finds!
ReplyDeleteThis is such a lovely idea and so thrifty! They look gorgeous.
ReplyDeleteI've been thinking what to give my lil sis for her wedding/bridal shower gift and now I know.
Thank you so much for sharing.
Erin,
ReplyDeleteLots of other people have started making their own too after this post. Which is kind of funny really since it's really nothing unusual.
Savvy Chic,
Thanks! I'm making another batch for another cousin's bridal shower coming up in a few weeks.