
With my clothes pile taken care of, I decided to repaint a bookcase I had been using on my porch as a plant stand so I would have more storage space in my kitchen. While I was at it, I decided to finally finish revamping this wooden arm chair.
Look at the before and after photos.
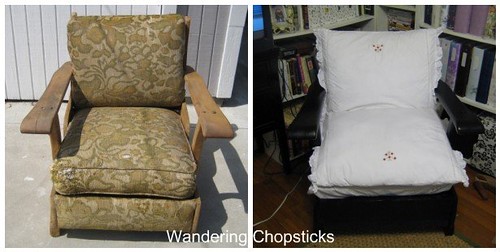
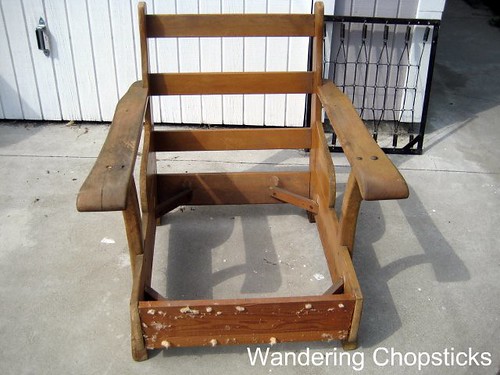
Would you pick up this chair off the street?
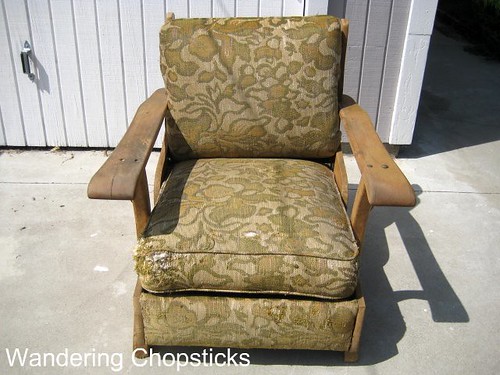
Eww!
Last, last April. (That's April 2008.) I was coming back from Jones Coffee Roasters - Pasadena, where cousin Q and I met up with my brother and his wife, when I spied this chair on the sidewalk.
I knew my cousin would be disdainful of my attempts to salvage it, so I dropped him off at home and drove back to check it out.
Grrross cushions! But they were removable. The wood was solid, not particle board. So I loaded the chair into my car.
I promptly tossed out the cushions.
Look at the years of grime on the wood.
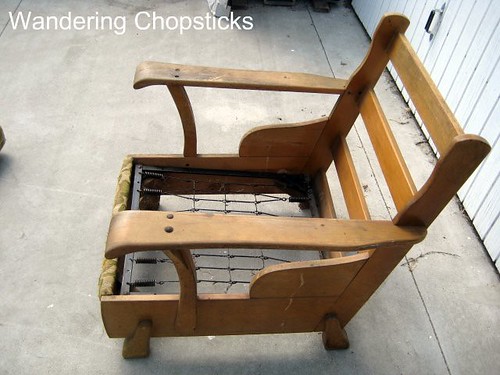
The wood was also coming loose on the sides so I hammered the dowels back into place and added a few extra nails for good measure. I also threw out the fabric that was on top of the springs.
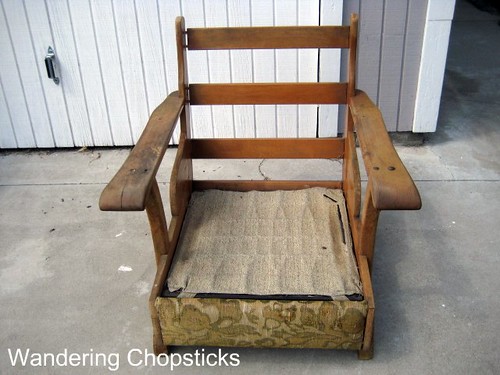
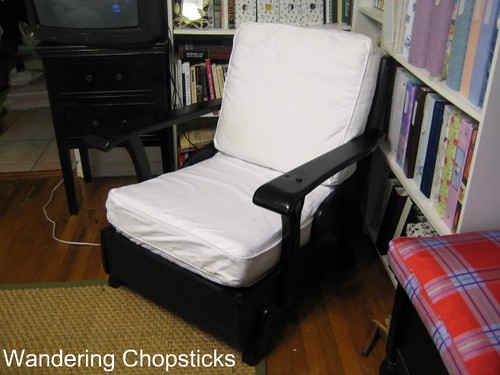
Good lines. I liked the arms and the sleigh-like sides. It's not quite mission-style, and sort of like a lounge chair.
There was still some nasty fabric on the front so I had to remove that too. And had to remove stray nails and bits of filler.
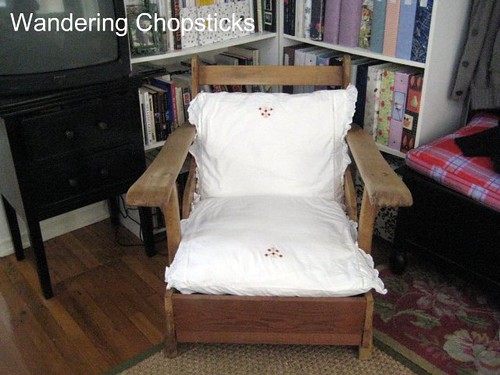
Then I scrubbed the chair like crazy with a brush and laundry detergent. I brought it inside and grabbed some cushions off my couch to see if they'd fit.
Not bad, eh?

Unfortunately, I needed those cushions for the couch. I saw similar cushions and covers at IKEA, but it cost $60 for the combo. No way was I spending that much on a chair I picked up off the street. So, I grabbed the big European pillows and shams I already had on my bed and used them instead.
Not bad. Sort of had a "shabby chic" feel and it was free since I used what I already had on hand. And so, there it sat for more than a year.
The wood wasn't that great. The panel in the front, since it was originally covered, was uneven and still needed to be sanded.
So finally, I used wood filler to fill in empty nail holes. Sanded it smooth. Wiped with baby cloths.

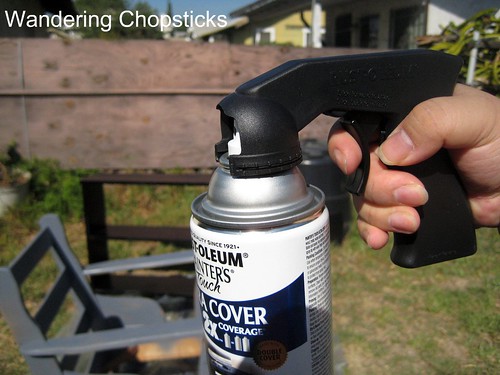
After wielding two spray cans -- one of primer and one for the bookcase, my fingers and arm were tired. I had to go back to Home Depot anyway to buy more paint for the chair, so I also bought this spray can nozzle. For $2.59, I highly recommend it. Spray painting went a whole lot faster and more evenly after that.
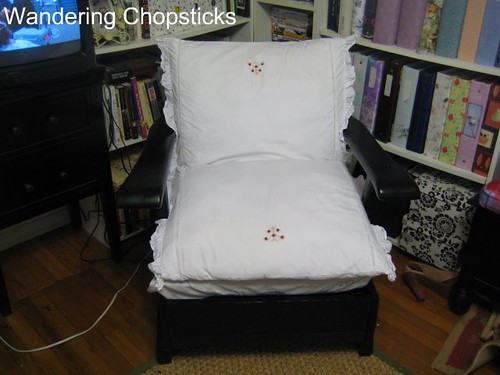
All painted.
I put the springs back into place and instead of sewing another cover for it, I just used a piece of cardboard.
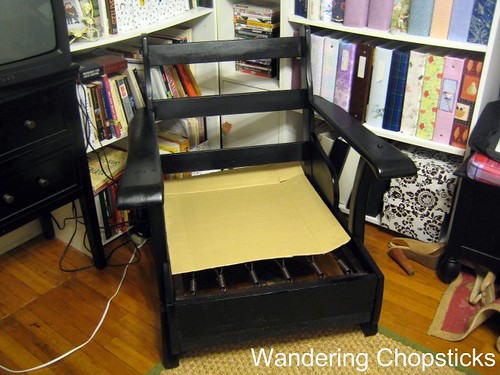
Nice cushions stolen from the couch for effect, but again, I can't afford that.
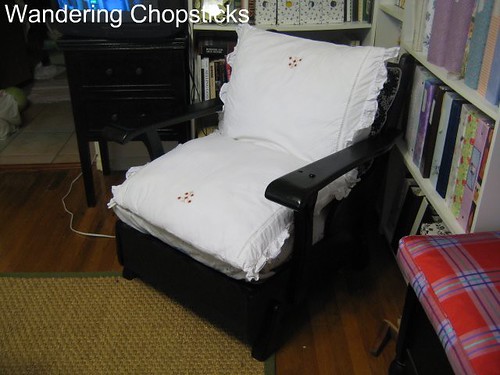
Meanwhile, I had bought two more pillows when they were on sale at Target for $7.99 each. I used my padded pillow shams to provide more cushion.

Then I covered the bottom pillow with a white vintage tablecloth so that it would blend in better.
And there you have it. A revamped wooden arm chair that I picked up off the street.
Total cost: Free wooden arm chair + $1.60 for 1/2 can of primer + $6.88 for two cans of semi-gloss black paint + $15.98 for two large pillows = $24.46
I didn't count the wood filler, sand paper, pillow covers, and first two pillows since those were things I already had on hand.
Now, to finish lining the bookcase so I can clean my kitchen before Thanksgiving next week. Eek!
*****
1 year ago today, my house was broken into. :(
2 years ago today, I asked is my scrap blanket hideous?
3 years ago today, the heirloom bell peppers I grew in my garden.
You are one resourceful gal!
ReplyDeleteYou're very handy & creative! I'm amazed at when people do when they restore things! Nice job!
ReplyDeleteWhat a clever gal you are. I'd say very nicely done!
ReplyDeleteVery nice, a great cook and crafty! It's funny, my grandmother in law once crossed the street to bring home a half broken chair to re salvage. I was so embarrased, I told her, G'Ma its not like we are poor, what if someone in our subdivision saw you, lol.Great job on the chair.
ReplyDeletei'm so impressed! i'm totally not handy at all. the chair looks awesome!
ReplyDeleteExcellent work, I love what you've done!
ReplyDeleteWhoa, impressive!
ReplyDeleteSo handy! It takes a special eye to see potential.
ReplyDeleteWe have an outdoor table that needs a new top. Something fell on top of the glass last winter and shattered it. I was thinking of doing tile...maybe I'll get around to it before the next summer...
Good choice on the black paint -- it complements your room with the other black elements. I like the basic structure of the chair and glad you saw it despite the ew-eliciting cushions!
ReplyDeleteAh that looks awesome! I love diy projects.
ReplyDeleteYou've got the gumption I lack, but wish I had, when it comes to these kind of home projects! Nice work!
ReplyDeleteWell done with the chair- I dont think I would have ever thought about doing something like that!
ReplyDeletePretty impressive. Now I'm scared to sit on it for fear of messing it up.
ReplyDeleteSusan,
ReplyDeleteI try. :P
SB R&R,
Thanks! Although this wasn't nearly as much work as what I've seen other people do.
Mary,
Thanks!
David,
So what happened to grandma's chair? Did she re-do it?
Carmen,
This was easy. Just a little sanding and painting.
SavoryTv,
Thanks!
TS,
Thanks!
Darlene,
I have the top from my bistro table that I'm just keeping around in case the glass shatters on another table. Silly to keep something around, but if it breaks, it'd be nice to have a backup!
Nikki,
I was so tempted to paint it red or something different, but in the end since all my furniture is black and white, it was best to stick with what would blend in.
Vinh!,
Thanks!
Marie,
Doesn't take much gumption. Easy to do. Or are you afraid of being seen hauling home trash? :P
Daphne,
The before photo might put some people off.
Weezer Monkey,
Nah, nothing to mess up. It's sturdy.
I'd totally buy that chair off you! Or perhaps you can let me know if you see another one like it on the street, so that I can just follow your recipe.
ReplyDeleteWhat would be funny is if the person who threw out that chair sees this and has regrets about tossing it.
Elmo,
ReplyDeleteYeah? How much you wanna pay? :P
I thought of that! What if that person saw my post and wants it back?
Oh, mine, mine, you are such a talented person, WC. What can't you do? Wish I could "rub off" 1% of your talent!. Wonderful job!!
ReplyDeleteCo Toan,
ReplyDeleteThanks! Unfortunately, there are a lot of things I can't do, but hauling home junk seems to be something at which I excel. :P
Nice articles and your information valuable and good articles thank for the sharing information lounge chair
ReplyDeleteThis bourbon citrus ginger hot toddy sounds like the perfect comfort drink for chilly evenings! I often find myself reaching for something warm after long days at work, especially when I’m setting up or rearranging [Office Furniture] in my home office. A cozy recipe like this is just what I need to relax and recharge—thanks for sharing!
ReplyDeletehttps://www.sohomod.com/office.html
Nice articles and your information valuable and good articles thanks for the sharing information lumbar support pillow for office chair
ReplyDelete